With a bit over a month to go until I depart for Anchorage and make my way to Talkeetna to meet the team and start the expedition, I feel like I’m rounding the final straight and making a last sprint to the line – the start line in this case.
Gear
Well I can FINALLY say that I’ve gathered all the kit I think I’ll need, with a few small exceptions for some minor stuff. As a lover of all things outdoor equipment and apparel I’ve enjoyed researching and acquiring various products, but I have to say I’m glad I’m done ordering and sizing and returning items! Online shopping has been both a blessing and a curse.
Being a member of some outdoor company’s pro deal programs has also been a huge benefit, and has certainly eased the impact on my bank account. I appreciate the support these companies have given me: Scarpa, Mountain Hardwear, Outdoor Research, Marmot and Edelrid.
I’ve shared some more information on the expedition gear for Denali in this earlier post.
Fitness
My conditioning and physical prep hasn’t been as straightforward as I’d hoped, as I’ve had to deal with a few old injuries – including what was my fourth surgery in the past couple of years! I think I’m all fixed/patched up now, but the operations and subsequent recoveries have definitely been an unwelcome interruption.
I’m a little nervous about the fitness that’s needed to ascend Denali, as the expedition plan makes it clear what’s required: 8+ hour days hauling 60lb packs and pulling sleds of the same weight up the glaciers. Alpine Ascents provided me with some guidance on what a training regimen might look like, and I’ve used this as the basis for my exercise routine:
- Aerobic fitness: I usually head to the gravel trails and hills of the nearby San Francisco Presidio to go for a 1-1.5 hour run once or twice a week, through the forests and along the sea cliffs with views over the Golden Gate Bridge.
- Hill/stair climbing: This has been central to my training, to prepare for hauling heavy loads up the mountain. As I live near the top of 84m/275ft Telegraph Hill in San Francisco, I’ve been doing multiple laps up the Filbert St and Greenwich St steps from the base of the hill to the top, and try to do this 1-2 times a week. My nemesis for this is an old 60L Macpac Pursuit alpine backpack that I’ve had for around 15 years. Over the past couple of months I’ve been filling it with full water bottles, my climbing rack and dumb-bell weights, gradually increasing the load from around 20kg/40lb now up to 30kg/70lb. With 30kg I can manage around 3-4 ascents of the hill in 1 hour; it’s slow going, but great practice for the climber’s trusty “rest step”!
- Stress/interval training: For interval training I’m once-more blessed with a great place to train right outside my doorstep on Telegraph Hill. There is a two-block loop on Montgomery St which probably includes a steep ~20m section. I sprint these two blocks, recovering 2-3 minutes as I jog back down, and repeat this 6 times.
- Strength training: I’ve been getting to the gym twice a week and combine strength work with some aerobic/interval training on the rowing machine and elliptical. As my legs are getting a good workout through the other exercises, I’ve been focusing on my core, chest, back and shoulders.
- Recreation: I’ve been trying to get outdoors once a week (or an overnighter if I can manage it) to put all of that fitness and conditioning into practice through some hiking or climbing.
- Yosemite trad climbing: I managed a day at Yosemite last week in which we did some 5/6/5.7 multi-pitch rock climbing
- Tahoe snowshoeing: My mate Nick and I snowshoed in towards Round Top near South Lake Tahoe, and I free soloed the 50-60 degree snow & ice Crescent Moon Couloir which was super fun. On an earlier trip, I snowshoed two summits near Donner Pass on a long 17-miler with the Sierra Mountaineering Club.
- Lassen wilderness hiking (planned): Daniella and I are off to Lassen National Park next weekend for an overnight wilderness hike/camp, depending on snow conditions and whether the roads are open.
- Shasta summit (planned): I’m aiming to tackle 14,180ft/4,322m Mt Shasta a couple of weeks before the expedition as a final capstone on my preparations.
Team
I’m really curious to meet the team on May 17th/18th in Talkeetna. As this is a group activity rather than an individual pursuit, it will take the whole team working together (with the guides) for us to get to the summit successfully.
Alpine Ascents shared the team roster with me this week, along with some other reminders and information. In addition to myself, these are the clients on our expedition:
- Oliver Ames
- John Paul Bailey (withdrew before the trip for personal reasons)
- Steve Camkin
- Nicholas Lingler
- Armando Ortiz
I don’t know anything about their backgrounds or experience, but I’m looking forward to getting to know them well over the course of the expedition. In addition to us six clients, we will have two AAI guides including the Denali legend Vern Tejas.

One thing I started to sort out as soon as I committed myself to Denali was the gear I’d need for the expedition. While I’ve accumulated quite a collection of mountaineering and general outdoor clothing and equipment over the years, the conditions on Denali (a combination of high altitude and polar temperatures) require a lot of specialty gear I simply don’t have and haven’t needed until now. There’s a lot I don’t know about climbing in those conditions but thankfully there’s a wealth of information out there and a lot of gear reviews to base some of my decisions on.
Expedition Company Equipment Lists
Each of the expedition outfitters provide quite detailed information about the clothing and equipment that each climber is required to bring. There’s unsurprisingly a lot of similarities between the lists, but also some glaring differences.
- Alpine Ascents International http://www.alpineascents.com/denali-rental-form.asp
- American Alpine Institute http://www.alpineinstitute.com/media/68397/wbutt_equipment_list.pdf
- RMI Expeditions https://www.rmiguides.com/mt-mckinley/west-buttress/
- Mountain Trip http://mountaintrip.com/alaska-mountaineering-equipment-list/
- International Mountain Guides http://www.mountainguides.com/denali-gear.shtml (link broken as content has been removed)
Previous Denali Expedition Experience
Prior expeditions provide a lot of feedback on how kit performed as well as recommendations on must-have/nice-to-have items – or things you can do without. I’ve trawled the internet to glean what information I can find.
- http://www.summitpost.org/gear-suggestions-and-tips-for-the-west-butress-route-of-denali/216103
- http://www.backpackinglight.com/cgi-bin/backpackinglight/denali_light_2007.html#.VFWajvTF_BE
- http://www.backcountry.com/explore/the-ultimate-gear-list-for-your-denali-trip
- https://www.wildsnow.com/3368/denali-mckinley-gear-tip/
Buy vs. Rent Decision
Alpine Ascents provides a list of personal gear I’ll need for the expedition so I don’t freeze my fingers and toes off and/or jeopardize the team. Communal equipment like tents, stoves, snow shovels, ropes, food and first-aid kit are provided by the company so I don’t need to worry about that stuff. I can also rent some of the real specialty kit that I’ll probably never need again, and at this stage that’s looking like just two items:
- Expedition sleeping bag: high-rated down fill, rated down to -30 to -40C
- Large volume backpack: around 100L capacity, able to carry loads up to 30kg/70lbs
- Mountain Hardwear BMG 105L
- Lowe Alpine Expedition 75:95L
Specialty Kit Purchased for Denali
It’s been enjoyable to spend time researching some of the real specialty cold-weather gear needed for Denali, and I’ve made some selective purchases.
Footwear
- Scarpa Phantom 6000 Boots: Double mountaineering boots with a neoprene/insulated insert, a waterproof outer and built-in gaiter. These boots should serve me well on this trip, and I will use them for future winter mountaineering and ice climbing days. I’m really excited about these boots and have been impressed with their performance and comfort so far.
- Forty Below Purple Haze Overboots: These are a necessary complement to double boots on Denali, due to the potential for extremely low temperatures high on the mountain. They’re made of heavy neoprene and completely enclose the boots up to just below the knee, and will be my insurance against losing some toes to frostbite.
- Forty Below Camp Booties: These are a bit of a luxury, but will sure beat clomping around camp each night in stiff mountaineering boots. They will fit inside the Purple Haze overboots to provide a bit more weather resistance and traction.
Clothing
- Mountain Hardwear Nilas Jacket: 850 fill jacket, hydrophobic down, fully baffled body and sleeves, awesome butter cuffs, minimal but ideal pocket placement. It has only 2/3rds the fill of the MHW Absolute Zero expedition parks (used on 8,000m peaks) but the Nilas uses a higher quality down and is just half the weight.
- Arc’teryx Alpha FL Jacket Shell: I’ve been wanting to get this jacket for a long time, and splurged on it when I was able to get it at a deep discount. I’ve had the earlier Alpha LT shell for many years, and love it to death, but it’s a Medium and really only good for layering in summer conditions. I went for the Alpha FL in a Large and it’s perfect – cut for alpine climbing, enough room for layering underneath, and lightweight without too many bells and whistles.
- Arc’teryx Gamma MX Hoody Softshell: Another thing on my wish list for many years, I’ve wanted this jacket for so many reasons and Denali was the excuse. It’s not cheap but it’s a great medium weight softshell jacket; and the light fleece lining should save me carrying another fleece up the mountain.
- Arc’teryx Konseal Hoody 3/4 Zip Midlayer Fleece: This item filled a gap in my repertoire, as I’ve needed a lightweight (around 100-weight) fleece top with a hood. This is the perfect midlayer, and I especially like the thumb loops and the close-fitting hood with built-in face mask which should be great inside the tent at night.
Handwear
- Outdoor Research Luminary Gloves: Got these as a mid-mountain, versatile pair of gloves (and because my Arc’teryx Beta AR gloves aren’t that warm, and would only be good down to around 0C to -5C I reckon). The Windstopper shoftshell outer makes them really comfortable to wear (a waterproof hardshell isn’t necessary as the below-freezing temperatures should mean I’ll be encountering more ice than water), I like the long gauntlet, and the removable fleece insert is a must as I’ll need to dry it out at night in my sleeping bag.
- Outdoor Research Alti Mitts: These expedition weight mitts are a must at high altitude when the wild weather really kicks up. I sized them XL to be big enough to fit lightweight gloves/glove liners inside, as I won’t want bare skin exposed whenever I might need to take the mitts off.
- Mountain Hardwear Compressor Pants: Another specialty item for Denali, these insulated overpants are a must for cold nights around camp and for a potentially extra-chilly summit attempt. They’re very bulky and the inseam is a bit long making the whole pant baggy, and I don’t like the elastic waist with a drawcord, but they’ll have to do as other insulated pants (e.g. Outdoor Research Neoplume) aren’t available in the spring/summer season.
Electronics
- DeLorme inReach Explorer: A text message device, emergency beacon and GPS unit in one, all with the help of the Iridium satellite communication system. Paired with my old iPhone this will let me stay connected with the outside world, track our progress, and post updates to social media (Facebook & Twitter). Can wait to start exploring what this handheld device is capable of!
- Instapark Mercury 10 Solar Charger: Compact and lightweight solar panel providing 10W (5V & 1-2A) output via 2 USB ports. I’ll need to buy a good battery too so that I can recharge devices and camera batteries in the tent in the evenings, probably around 4,000-5,000mAh.
Technical Equipment
- Black Diamond Couloir Harness: I’m not sure about the fit as it doesn’t sit over my hips and is pulled down low at the front, so I might return it and stick with my existing Black Diamond Ascent harness.
- Petzl Summit 2 Ice Axe: I’ve been lugging around a Charlet Moser 65cm ice axe (straight shafted and T-rated, with a rubberized shaft) that I’ve had since my early days in Switzerland over 15 years ago, but needed something more lightweight for Denali. While I could have got away with really basic ice axe for glacier travel, I wanted something I’d find a bit more useful on steeper mountain terrain and liked the look of the redesigned Summit with its curved shaft and ergonomic design. I decided to go for the borderline too-short 59cm length rather than the more traditional 66cm length, as I expect it will be easier to use/swing when beyond piolet-canne mode (i.e., in piolet-rampe or piolet-traction mode).
- Petzl Ascension Ascender: Again, another bit of kit I haven’t needed until now, but a crucial item as we’ll be heading up fixed lines on the steepest section of the route between 14K camp and high camp. As I’m right-handed and want to have my ice axe in my dominant hand handy in case I take a fall, I got a left-sided device.

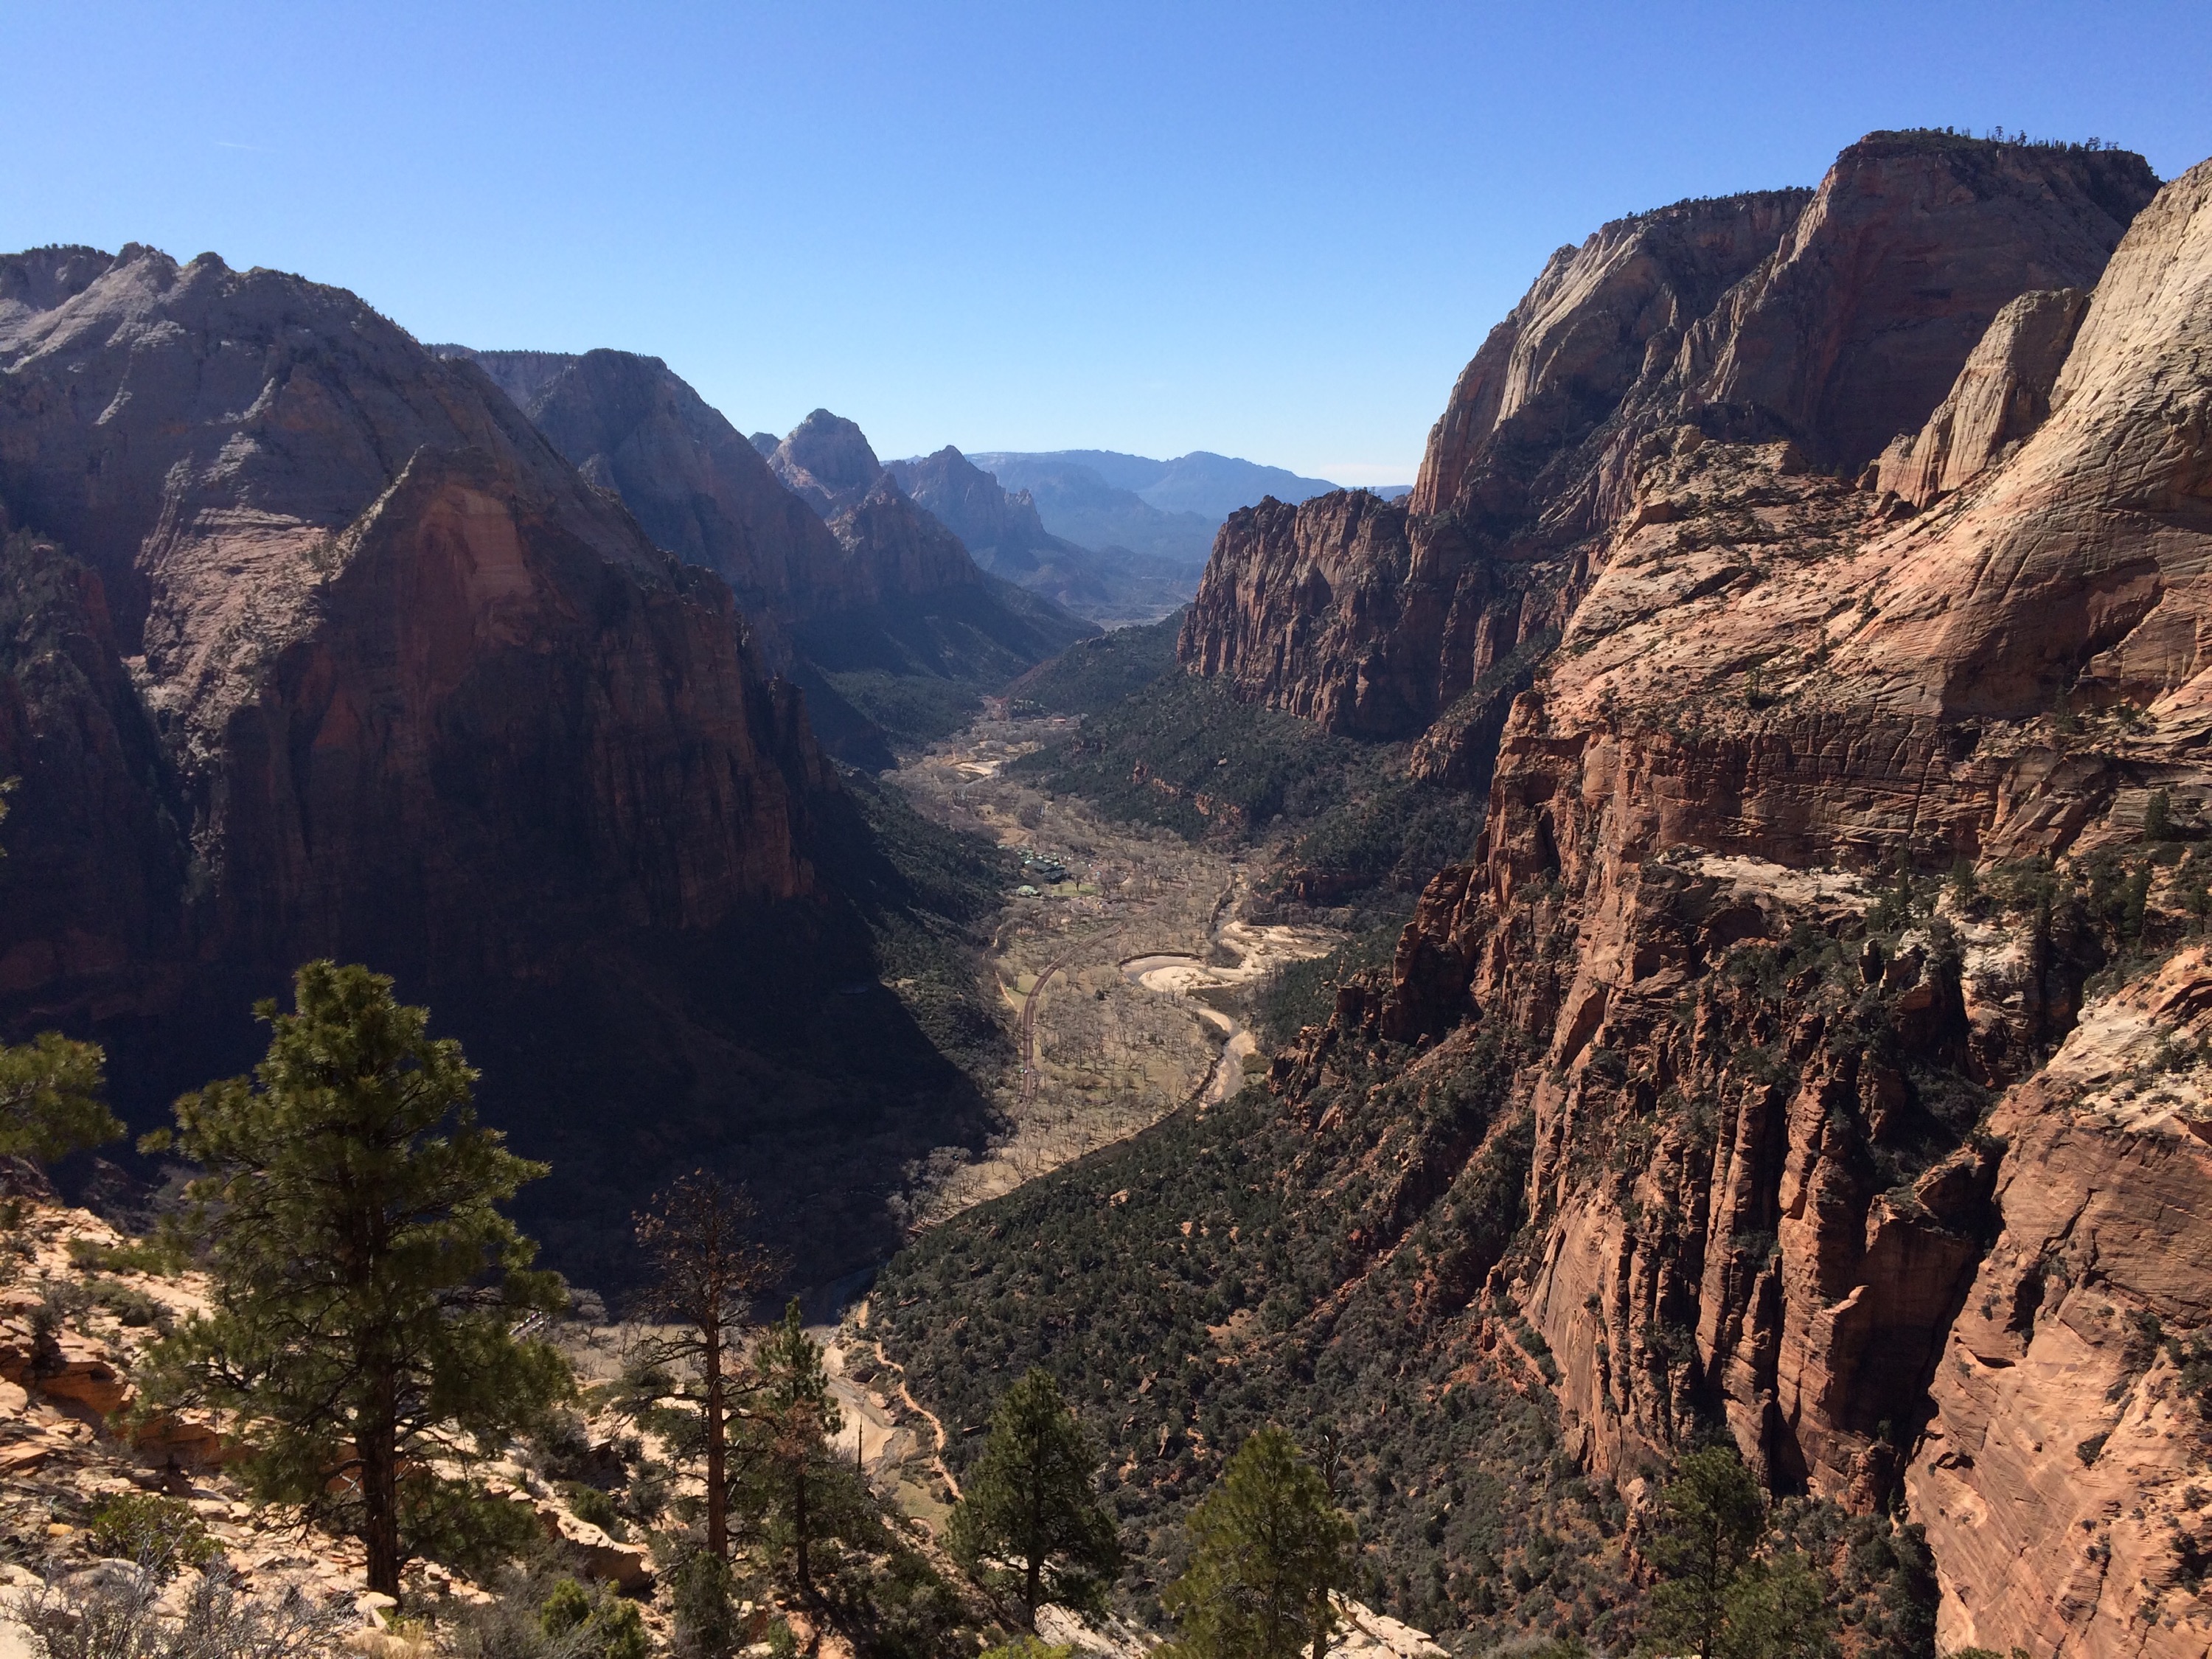
Daniella and I took the opportunity presented by the President’s Day long weekend to head to Zion National Park in Utah. I hadn’t been to Zion since my first trip there a decade ago while I was at business school, and I was keen to go back and explore more of the park.
We flew to Las Vegas on Friday evening, and after some stuffing around with the rental car (and tracking down an REI to buy fuel for the camp stove) we hit the road around 9pm and drove north up I-15 through Nevada, through the north-west corner of Arizona and into Utah. It was after midnight when we drove into the park, and as everything was closed we went to the Watchman campground to hopefully find a place to camp for the night. All the signs said the campground was full, but we drove around until we found what looked like a vacant spot and set up the tent in the gusty, cold wind.
At dawn we woke up to learn that we had set up the tent in someone else’s site, but we were pointed towards a vacant campsite nearby which had just been vacated (it was first come first served); lucky we did so as the campsite was very full, and we would otherwise have been out of luck. The first thing we did was get to the wilderness desk at 8am to try and secure a permit for the following night, and we were lucky enough to score a great campsite up on the West Rim for the night we needed.
Zion Canyon
With all the admin out of the way, we drove north into Zion Canyon to do some sightseeing on what turned out to be a spectacular, sunny and cool day. We walked to the entrance to the Narrows (the famous canyon hike up the river) and were surprised to see so many brave souls wading in to what must have been some pretty icy cold water. We finished the day hiking up into Hidden Canyon, and after a nice 45 minute hike up to the mouth of the canyon we found an exposed rock overlooking the main canyon to have lunch on. After lunch we scrambled our way a distance into the canyon before turning around and heading back down to the car. On the way out of the canyon we stopped off at the park Lodge for a refreshing drink out on the deck looking up at the towers and cliffs. By the time we made it back to the campsite it was nearing sunset, so we grabbed some wine and scrambled up a nearby hill to watch the colours change.
West Rim Wilderness Hike
The next morning we packed up camp and drove to the Grotto trailhead, arriving there around 9am. We saddled up with our boots and packs and started the hike uphill. We had secured a wilderness permit for one of the West Rim campsites, but rather than hike down into Zion Canyon from the north we were going to do West Rim the “hard way” all the way up from the canyon floor.
The early start meant we avoided the morning sun on much of the ascent. The trail was full with ill-equipped day hikers heading up Angel’s Landing, but by around 10:30am we had reached the point at which the West Rim trail peeled away from the crowds. We had already done about half of the total ascent for the day so we took our foot off the gas a little and enjoyed the steady climb north on the trail along the edge of the canyon walls.
By early afternoon we crested the rim of the canyon and came across our campsite. Campsite #2 turned out to be a real winner, with space for just two people (ourselves) in a location with views back east over the canyon and a hint of Bryce Canyon cliffs in the distance. We dumped our gear and walked down to the West Rim spring, an iffy water source which was fortunately still flowing (just), and found a nearby rock on the cliff edge for a tasty picnic lunch.
After lunch we set up the campsite and left our gear there while we continue the hike to see some of the views out to the western side of the park. After a couple of hours of soaking in the views we returned back to our campsite and set to making dinner as the sun set and the temperatures dropped to around freezing.
Angel’s Landing Side-Trip
As we were headed back the way we came up, we emerged back on the main Angel’s Landing trail by mid-morning the next day. After stashing our packs away from the crowds we joined the conga line heading up the chains. It’s an awesome, exposed hike and scramble along a knife-edge ridge with tremendous views, but I was frustrated and annoyed at the ridiculous number of people on the hike – with a fairly high number freaking out at the exposure and perceived “risk”. What should have taken about 15-20 minutes took double that time waiting in the “traffic jams” of people going up and down. The views at the top did however make the hike up worthwhile – it’s a world class outlook north and south along Zion Canyon.
We were back at the car around 2pm, and basking in the glow of our hiking success we started the long drive back to Vegas.
On the way out of Zion we swung by the old ghost town of Grafton, which has been abandoned since the late 1800s. There wasn’t a lot there apart from a couple of old buildings and the Mormon church that had been restored, but it was a pleasant enough place for a picnic lunch. We drove back south through the desert and were back in Vegas by late afternoon. As our flight the next morning was at 6am, our plan was to grab a nice dinner, have a few drinks and stroll around the strip before getting a few hours of much-needed sleep before the early morning wake-up. We went to the Aria casino and were fortunate enough to get into Michael Mina’s new French restaurant there AND take advantage of the happy hour specials